The Setup 🛠️
Let’s get into it
Always the least fun part of things, but here we are. Let’s start by getting the repo onto your machine. I want to also reiterate that nowhere in this guide will you be expected to pay for any technology if you don’t want to.
Step 1: Repo setup
1.1 Download the Repo
If you missed it, here’s the download button.
1.2 Install modules
You’ll want to unzip the repo into your preferred directory, then open up that directory in your favorite code editor.
Spin yourself up a terminal in your working directory and install your modules.
npm i1.3 Create a git repo
Using whatever method you like, create a git repo on your git provider. If you simply press Publish on your git tab in VS Code, you should
get the option to create a public/private repository. If you’d like the name of your repo to be your actual final project name, you’ll want
to change the name field in the ./package.json file before you publish.
If you don’t use VS code, you can run this in your terminal instead:
# Install GitHub CLI if not already installed
# macOS: brew install gh
# Ubuntu: sudo apt install gh
# Windows download GitHub CLI https://cli.github.com/

# Authenticate (if you haven't already)
gh auth login

# Create a new repo under your GitHub account
gh repo create your-repo-name --public --source=. --remote=origin --push
1.4 Create a stage branch
# Step 1: Make sure you're on the main branch and up-to-date
git checkout main
git pull origin main

# Step 2: Create the stage branch
git checkout -b stage

# Step 3: Push the stage branch to your remote
git push -u origin stage
We will be using the stage branch for Content Preview and production promotion.
This is all we will do here for now, later we will have to change around some variables to get the code working—but that’s going to require us to do some other setup.
1.5 Protect your branches
This guide will assume you follow the common branch protection flow most companies use. I won’t be giving a full tutorial here because it’s a bit outside the scope. But here are the general rules.
master
- Only updated via pull requests from stage
stage
- Only updated via pull requests from feature/*, bugfix/*, or hotfix/*
feature/*, bugfix/*, hotfix/*
- These represent your feature branches and can be pushed to directly
- Open pull requests from these into stage when ready
Step 2: Contentful setup
2.1 Create Contentful account
Head over to Contentful and create your account—or skip this if you already have one.
Create your a new space, then you should see a blank screen with no content. The URL should look like this:
https://app.contentful.com/spaces/[your-space-id]/views/entries.
2.2 Get your API keys
Now head to here:
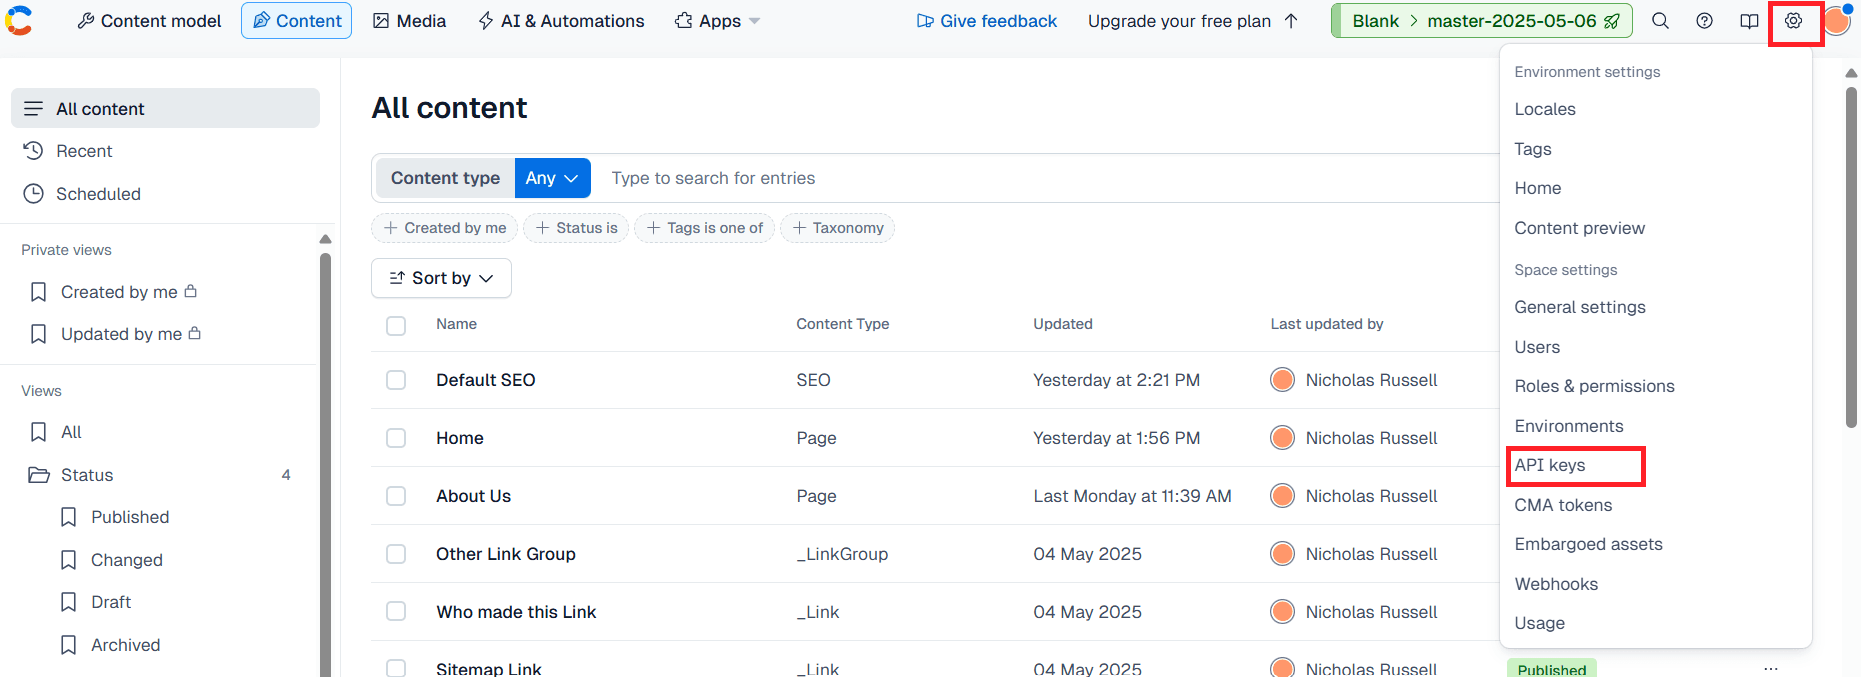
and create your first API key.
The name doesn’t matter and you can leave everything default. You’ll want to record your Space ID, your
Content Delivery API - access token, and your Content Preview API - access token.
Now please navigate to CMA tokens in that same dropdown menu and create your first CMA token (or personal access token as says the modal).
You can set the expiration date to whenever you feel comfortable. This token will not be used by your application, so don’t worry about it
expiring and breaking your app. When Contentful shows it to you, copy it down. You will only ever see its value once.
You should now have:
- Space ID
- Content Delivery Token
- Content Preview Token
- CMA Token
2.3 Populate your environment
After you’ve installed the apps, you can import the example environment into your new master environment (the default name of your first
environment). This will make your new environment an exact replica of what you see on the
example site . If you plan on not using any of the content types or pre-built
components available in the boilerplate repo, you can skip this step.
We can facilitate populating the environment quickly by using my contentful-utility-suite tool . It’s a CLI tool that will save you a lot of time with content migrations, exports, imports, searching, and some other useful tasks. You’ll want to install that globally like so:
npm i -g contentful-utility-suiteThen you can download the environment export with this button:
You will get a .zip file called: contentful-space-export.zip.
Now find a good a place to run the CLI tool with this command:
contentful-utility-suiteYou’ll be prompted to set up a config, you should use the values from Step 2.2. If everything is correct, the CLI tool will tell you your test passed and you will be ready to import the downloaded JSON into your Contentful environment.
In your working directory, you’ll want to create an outputs folder, and under that, an exports folder:
working-directory/
└── outputs/
    └── exports/
Then unzip the contents from contentful-space-export.zip into that exports folder.
Let’s breakdown the steps in the CLI tool.
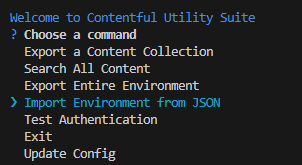
Choose the Import Environment from JSON option.
✔ Choose a command Import Environment from JSONConfirm that you understand the implications of importing
✔ Before continuing, do you understand that this command could potentially overwrite every aspect of your environment? YesChoose your Space
If you didn’t name your Space it will be “Default Space”
✔ Please choose a space Default SpaceChoose your master environment
✔ Select an environment masterChoose your “full-export.json” file
? Please choose a file from the exports directory. (Use arrow keys)
❯ output\exports\full-export.json
Select “yes” for uploading assets
✔ Upload assets? (You only need to upload assets if you are importing across spaces) YesYour import should start, expect it to take a few minutes.
When complete, confirm the import was successful in your dashboard, and you’ve completed this step.
2.4 Create your aliases
Note: Steps 2.5-2.7 are not the most intuitive. I recommend you refrain from asking “why?” in this step, the questions will be answered later. If you’d like to read on what exactly we’re doing here before the set up, you can read this page first (I don’t blame you). Also, this part of the guide will vary significantly for free tier users.
Go to your environments page here:
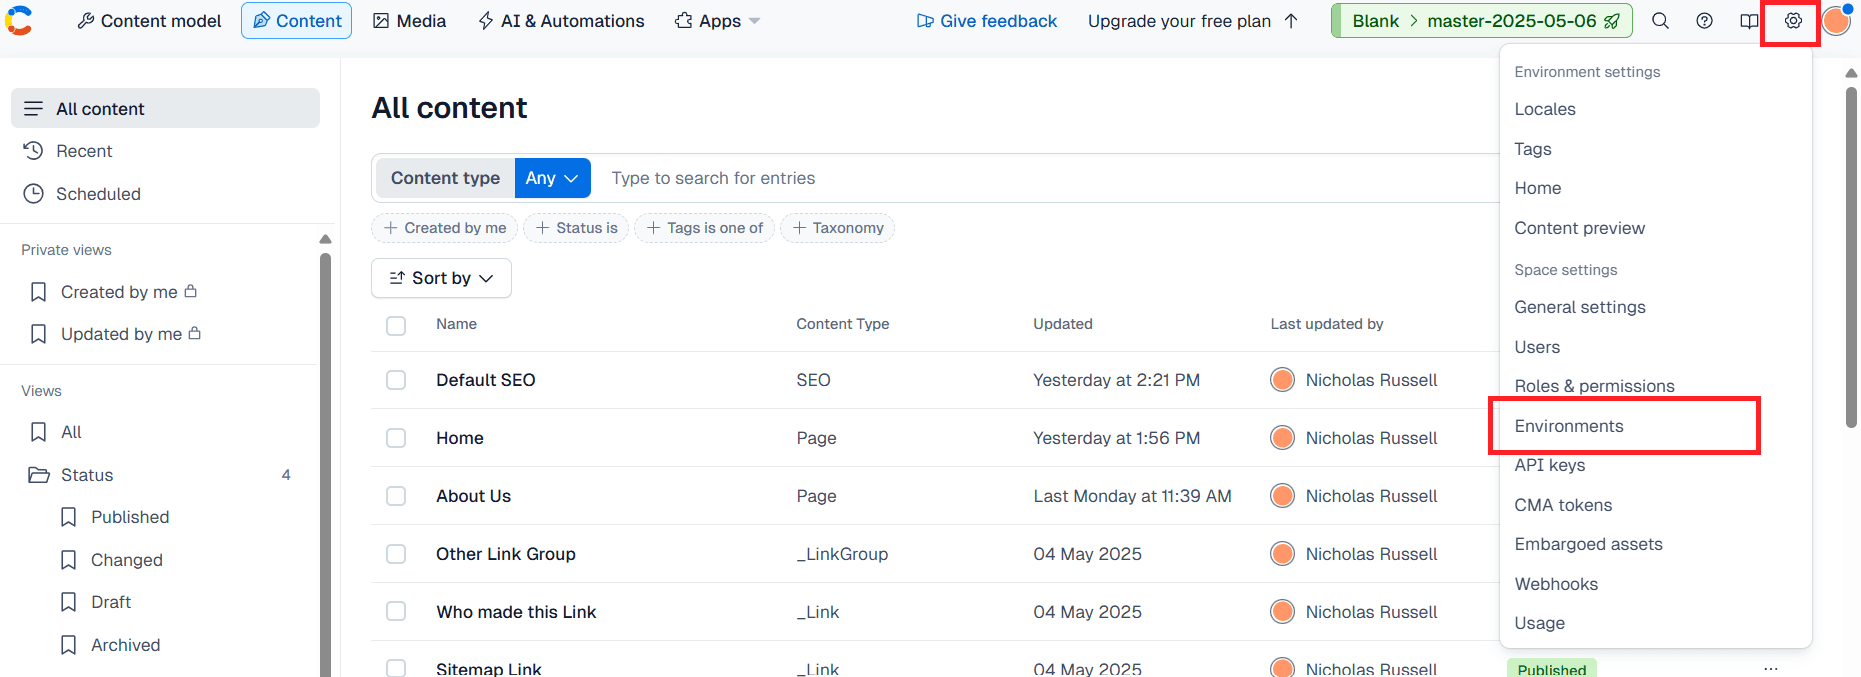
And add an alias.
Free tier: You only have access to one alias. Name your only alias production, but if it defaults to master that’s also fine (just
remember that when I say production that will mean master to you, in reference to aliases).
Non-free tier: You’re going to want to create 3 aliases: production, stage, development. You can point all of these to any
environment for now.
2.5 Clone your environment
Go to your environments page here:
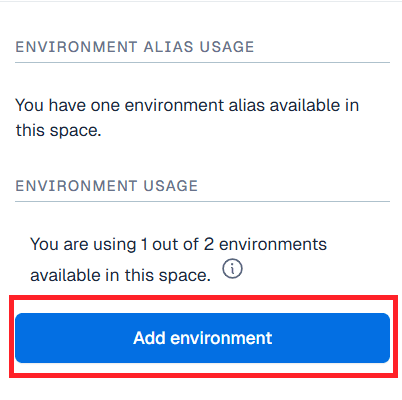
and click Add environment.
When prompted for an ID, use prod-[MM.DD.YY]. So if today is May 5th, 2025 the ID would be prod-05.11.25. When the environment is
created, it should automatically clone your only other environment. If not, when asked to clone, just… select the only available
environment.
We will then erase our original environment (should be named master) and click Add environment again (for naming purposes).
When prompted for an ID, we will call it prod-[MM.DD.YY]-clone. So if the last environment you created was called prod-05.11.25, this
one should be called prod-05.11.25-clone.
2.6 Point your aliases
Point your production alias to prod-[MM.DD.YY] and the other two aliases (non-free tier only) to prod-[MM.DD.YY]-clone.
2.7 Fix your API key
Now that we have more aliases, you’ll have to go to the API key you made in the API keys menu.
Check every box you see here, all environments and aliases. For non-free tier users, you should only need to check your aliases boxes, but checking them all doesn’t hurt.
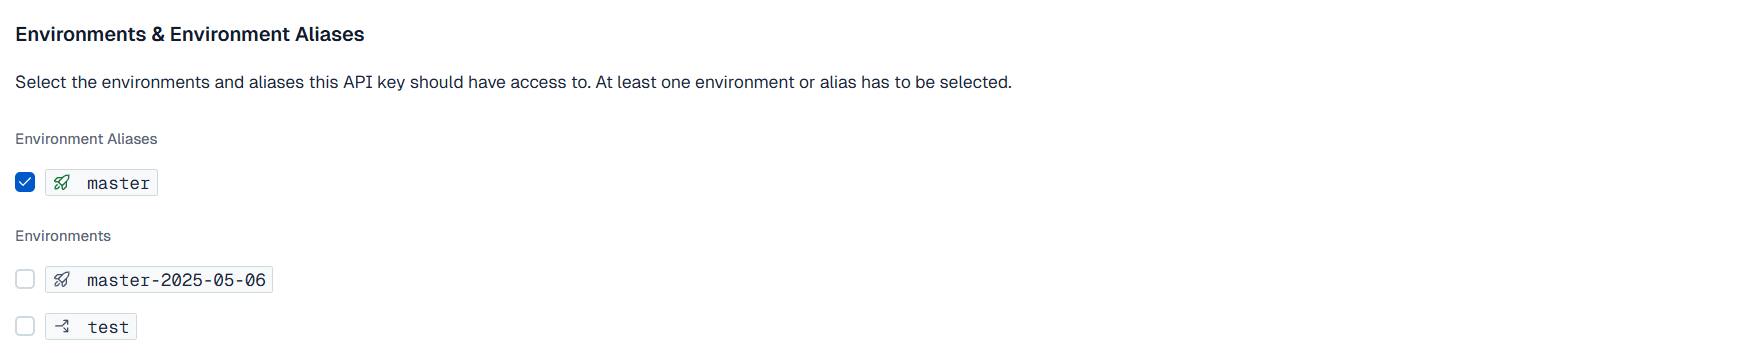
This will make it so our API key will work for all of our Vercel environments.
You don’t need to check any environments.
2.8 Install helpful Contentful apps
Go to the following URLs and install each of the following Contentful apps.
- Merge App (Make sure you check each environment checkbox to give the app access to all your environments.)
- Color Picker
- Image Focal Point
The only one of these truly required will be the Merge App—for facilitating content migrations.
Step 3: Vercel
3.1 Create a Vercel account
Create an account on Vercel if you don’t already have one Vercel .
I recommend you sign up through your git provider so you can easily import repos—and of course I recommend you use GitHub as your git provider, if not just because it’s what I used and it will be simpler to follow this tutorial if you use the same.
3.2 Create a project
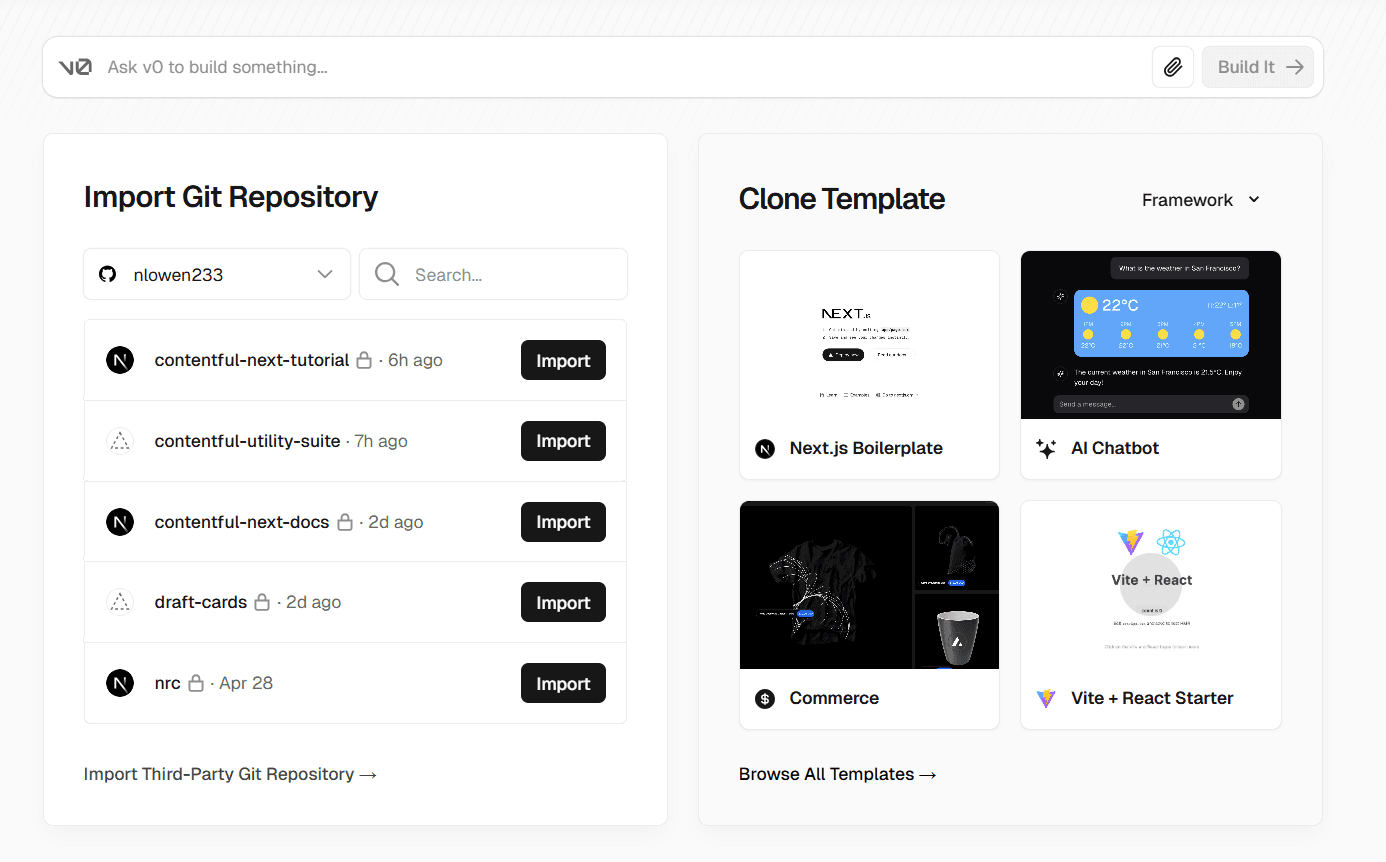
Find the Create Project button and click it.
You’ll see something like this screen, and click the right repo to import.
When you get to the New Project screen, you will need to add a few environment variables before you click Deploy. Here’s a list of what
you’ll need. You can copy all these, replace the bracketed values with your own, and you can actually bulk paste all these into the first
input box, Vercel will understand what you’re trying to do.
CONTENTFUL_DELIVERY_API_TOKEN=[your-delivery-token]
CONTENTFUL_PREVIEW_API_TOKEN=[your-preview-token]
CONTENTFUL_ENVIRONMENT_ID=production
CONTENTFUL_SPACE_ID=[your-space-id]
HEADER_SYS_ID=3URUvstRnYFmkTELtvUNbv
FOOTER_SYS_ID=Bf70h0rVlIUFZXQEaqtLq
DEFAULT_SEO_SYS_ID=2GYJOAYvdQSB9CBBJnHnX
FORCE_DISABLE_MAINTENANCE_MODE=1
Once you paste in those environment variables, you should be all set to click Deploy and get a successful result. We will worry about
subbing out environment variables on development and preview later in this guide.
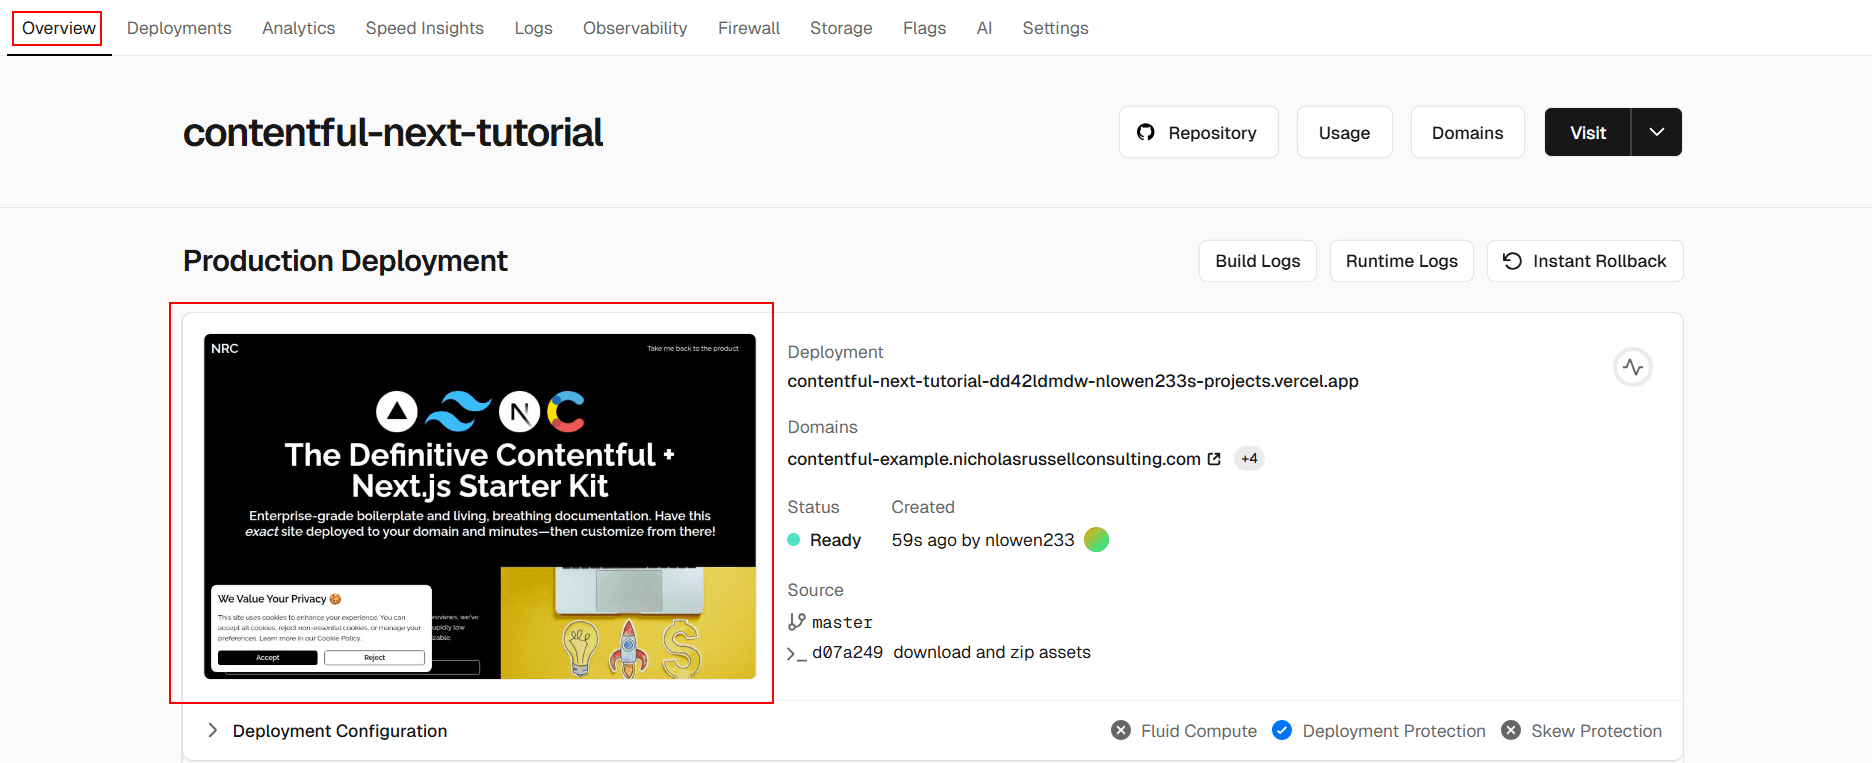
After a successful deploy, you should see your deployed application in the Overview tab. Click into the deployment and make sure
everything looks correct.
3.3 Enable analytics
Navigate to your Analytics tab and enable analytics, the code is already in place, so this should just work out-of-the-box. It is not
standard to use Vercel analytics on enterprise level projects, so it’s up to you whether to keep this on or turn it off.
If you are not going to use Vercel analytics, you can remove the <Analytics> component from the root layout (src\app\layout.tsx).
export default async function RootLayout({
    children,
}: Readonly<{
    children: React.ReactNode;
}>) {
    ...
    return (
        <>
            <Analytics /> {/* remove this*/}
            <html lang={localeToHTMLLang(locale)}>
                ...
            </html>
        </>
    );
}
3.4 Domains
If you have a domain you’d like the project to sit on, you can add it in the Domains tab. You’ll need domains for our locale setup and our
Content Preview setup to work.
Before Vercel can use your domain, you’ll need to access your records in your domain provider’s portal and add the following.
To add a root domain you’ll need to add an A record.
| Type | Name | Value / Target | TTL |
|---|---|---|---|
A | @ | 76.76.21.21 | Automatic |
Every following domain you add off that original will need a CNAME record.
| Type | Name | Value / Target | TTL |
|---|---|---|---|
CNAME | ... | cname.vercel-dns.com. | Automatic |
Here are what my domains look like:
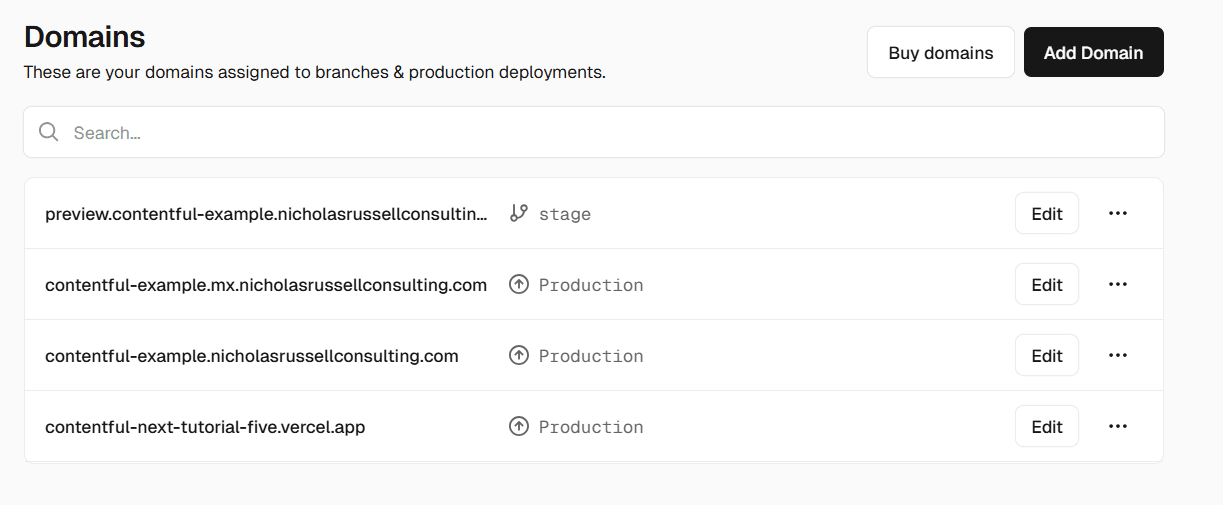
preview.contentful-exampleis for showing thestagebranchcontentful-example.mxis for the spanish localecontentful-exampleis normal productioncontentful-next-tutorial-fiveis Vercel’s default production domain (I don’t use it)
And to be as specific possible, here are the domains you’ll need:
- A production domain
- A domain that points to your
stagebranch, we use this for Content Preview and for pre-production testing - 1 domain for each locale you support
For each domain you add, make you sure you add it to the DOMAIN_LOCALE_MAP and the DEFINITIVE_DOMAIN_MAP in src\constants.ts in the
repo to. This will affect what locale is shown on what domain.
3.5 Turn off automatic builds
Because we are using GitHub actions, we will turn off Vercel’s automatic deployments when a branch is pushed.
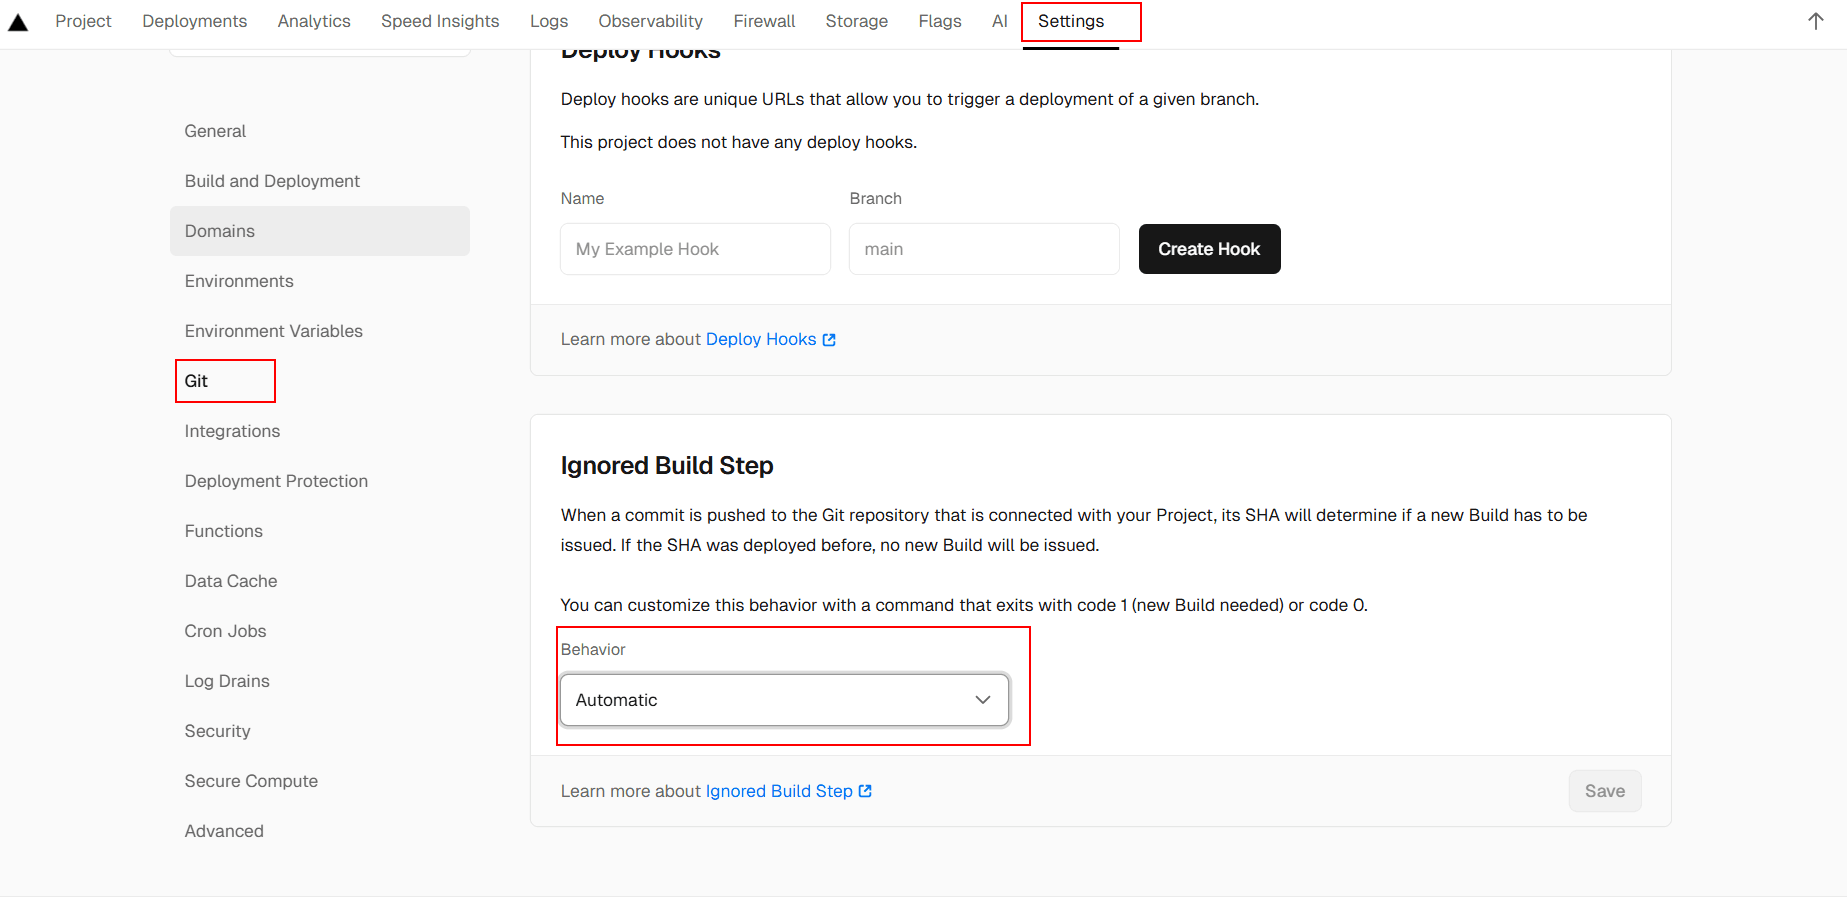
Set Automatic to Don't build anything.
If you see a message that says Configuration Settings in the current Production deployment differ from your current Project Settings,
that’s normal.
3.6 Add your GitHub Action Secrets
In the GitHub Settings tab, go to the Security section of the left-hand sidebar and click Actions.
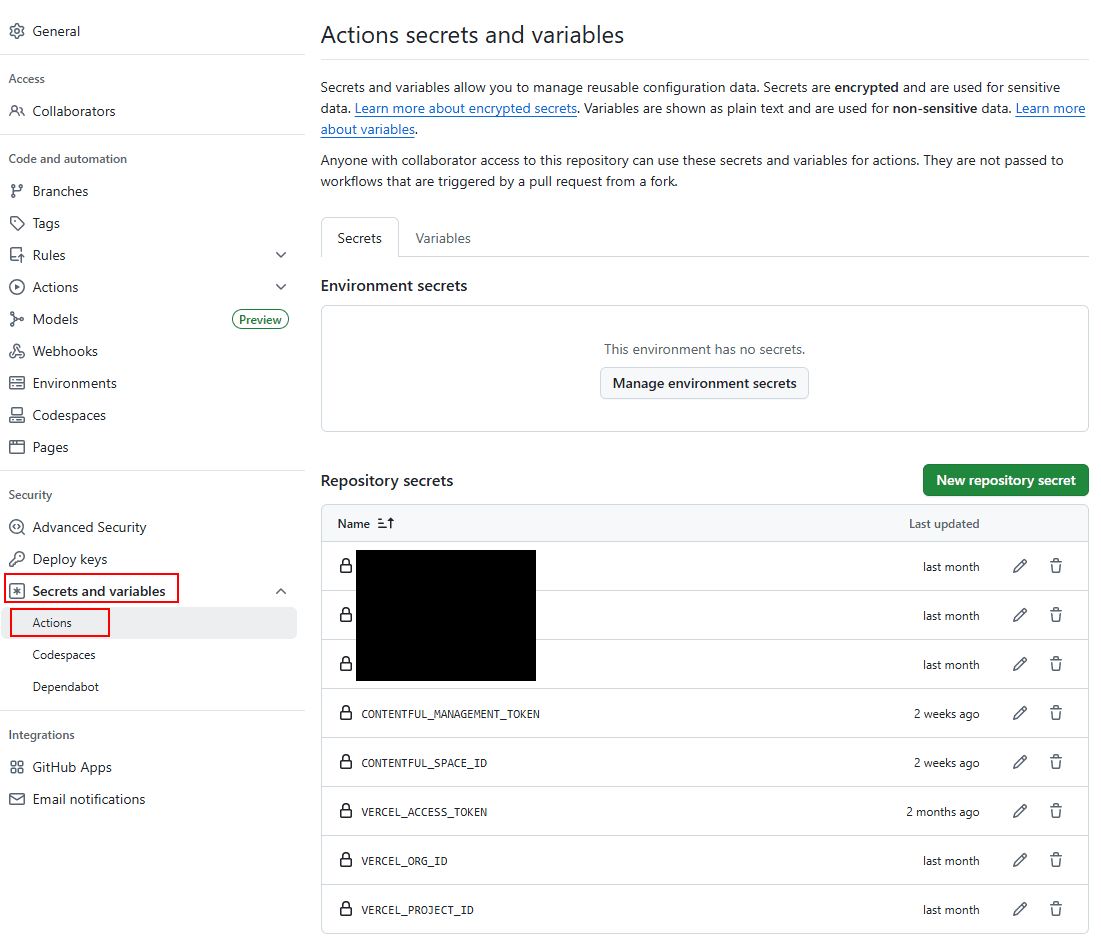
Add the five keys shown here. You should have all of these keys from earlier steps except VERCEL_ORG_ID and VERCEL_PROJECT_ID. You can
find these in your project’s URL:
https://vercel.com/[VERCEL_ORG_ID]/[VERCEL_PROJECT_ID]
3.7 Setup maintenance mode (optional)
If you don’t need the ability to redirect your users to a maintenance page during content promotions, you can skip this section.
Go to your Storage tab in Vercel and click Create Database.
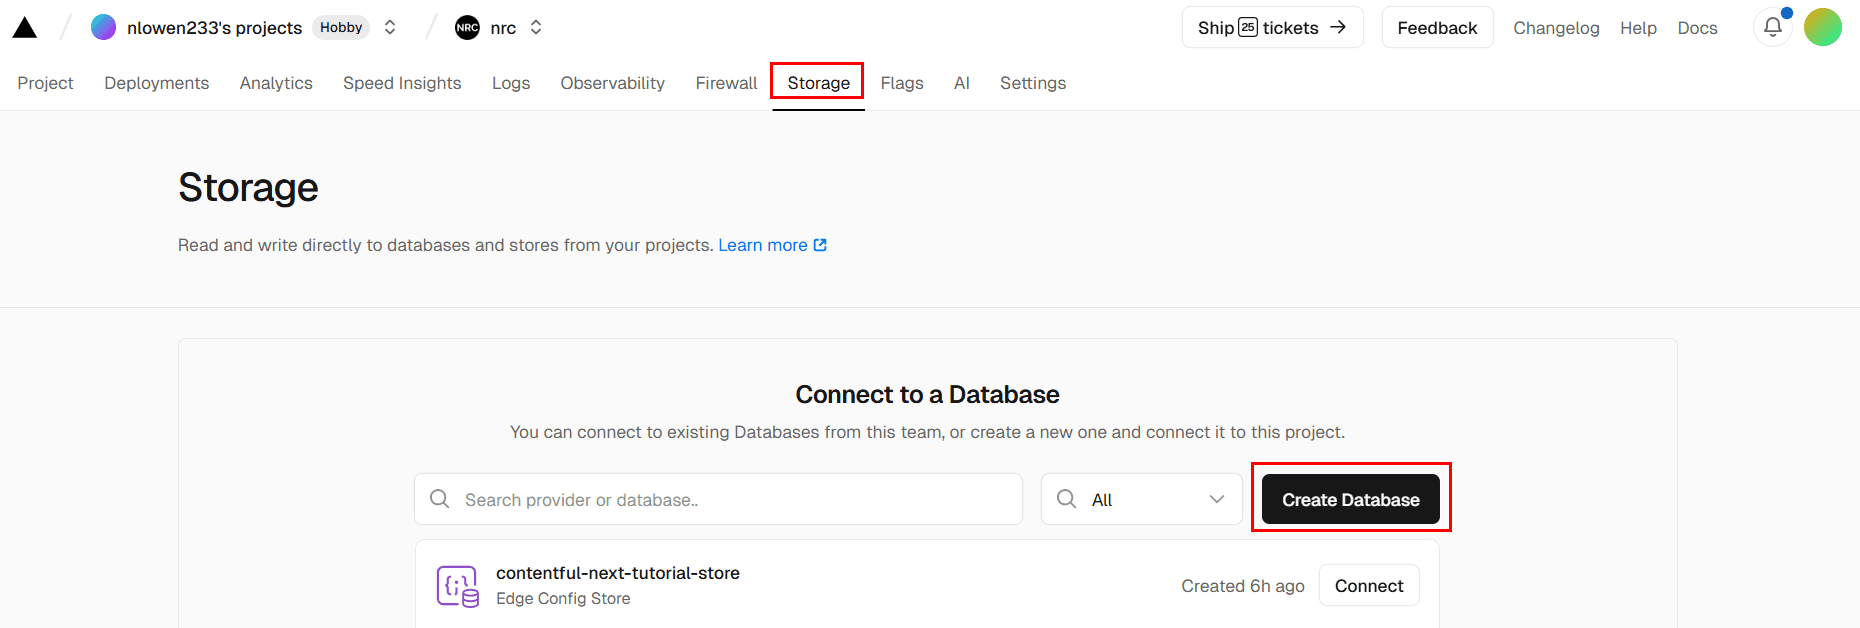
Create an Edge Config and name it whatever you’d like. Connect it to your project.
Give it a single key:
{
    "isMaintenanceMode": false
}
By default, FORCE_DISABLE_MAINTENANCE_MODE is on so that your first deployment doesn’t crash. So you’ll want to change that to:
FORCE_DISABLE_MAINTENANCE_MODE=0 in your environment variables.
3.8 Run your production pipeline
To test that your production pipeline works, you can follow the steps on this page.
Step 4: Running Locally
4.1 Adding environment variables for development & preview
Here we will be adding our environment-specific environment variables. The only environment variable that’s affected is
CONTENTFUL_ENVIRONMENT_ID.
Free Tier:
Create another environment variable called CONTENTFUL_ENVIRONMENT_ID only for development and preview. Set its value to be the cloned
environment name from Step 2.6
(prod-[MM.DD.YY]-clone).
You should end up with this:
| ENV Variable Name | Example Value | Development | Preview | Production |
|---|---|---|---|---|
CONTENTFUL_ENVIRONMENT_ID | production | ⬜ | ⬜ | ✅ |
CONTENTFUL_ENVIRONMENT_ID | prod-[MM.DD.YY]-clone | ✅ | ✅ | ⬜ |
In the repo, in all pipelines in the /github/.workflows directory, remove the --env flag when it references development.
--env CONTENTFUL_ENVIRONMENT_ID=development
You will find occurrences of this flag in these pipelines:
pr-deploy-es.ymlpr-deploy.yml
In the stage-deploy.yml pipeline, you should switch the --env CONTENTFUL_ENVIRONMENT_ID=stage to
--env CONTENTFUL_ENVIRONMENT_ID=production.
Non-free Tier:
Create two more CONTENTFUL_ENVIRONMENT_ID environment variables.
CONTENTFUL_ENVIRONMENT_ID=stage (check only preview)
CONTENTFUL_ENVIRONMENT_ID=development (check only development)
You should end up with this:
| ENV Variable Name | Example Value | Development | Preview | Production |
|---|---|---|---|---|
CONTENTFUL_ENVIRONMENT_ID | production | ⬜ | ⬜ | ✅ |
CONTENTFUL_ENVIRONMENT_ID | stage | ⬜ | ✅ | ⬜ |
CONTENTFUL_ENVIRONMENT_ID | development | ✅ | ⬜ | ⬜ |
4.2 Environment variables scripts
I have two nice little helpful scripts for pulling environment variables from Vercel on dev and build. To get them setup you’ll need to
go to scripts\vercel-pull-build.js and scripts\vercel-pull-dev.js and change PROJECT_NAME and SCOPE_NAME.
If we look at the URL of your project dashboard we can get them both, they are different names for VERCEL_ORG_ID and VERCEL_PROJECT_ID.
https://vercel.com/[your-scope-name]/[your-project-name]
Change the two files, then you can run the following:
npm i -g vercel
npm run dev
When prompted to login to Vercel, you should choose your git provider (unless you deviated from the guide earlier). Now, when your local starts, you should automatically have all of your environment variables, which means your app should run without issue.
Step 5: Content Preview (non-free tier only)
5.1 Create preview platform
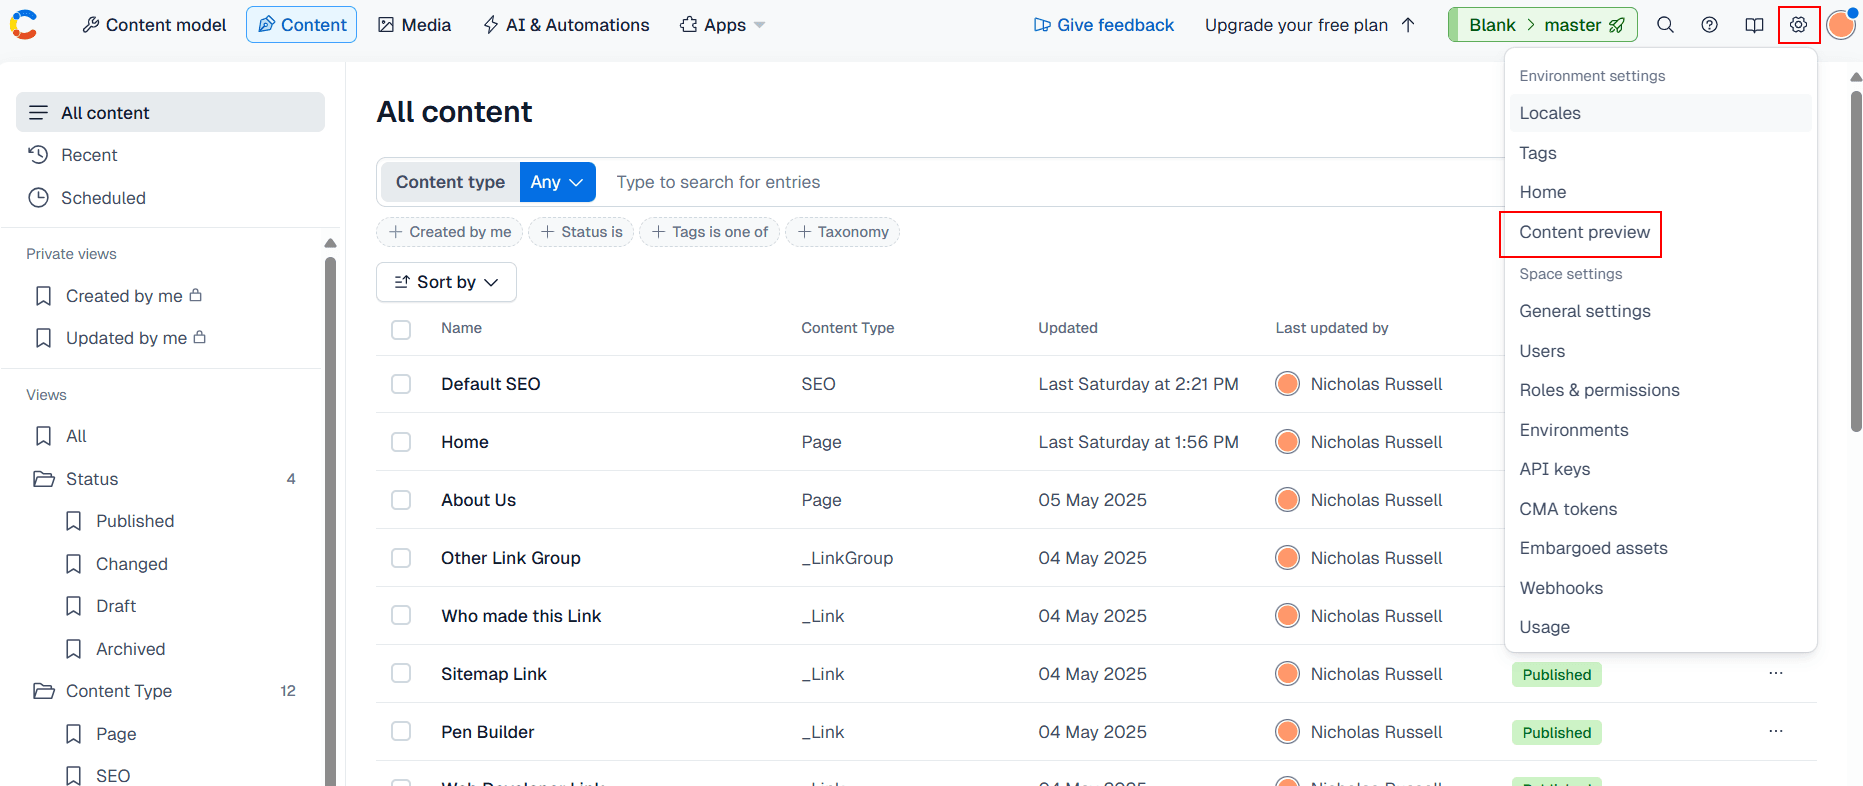
Click Content preview in the gear icon dropdown.
Click Create preview platform on the Content Preview page.
5.2 Get your bypass token
We will need our bypass token from Deployment Protection tab in Vercel. You can create one here.

5.3 Fill out fields
We will be creating a preview platform for our stage branch/stage domain.
| Field | Recommended Value | Notes |
|---|---|---|
| Preview platform name | Stage | This will be our preview for development content |
| Description | Preview the stage domain | Optional; just for internal clarity |
| Content types | Page | We will only be able to preview pages |
For Preview URL for Page, you’ll want a URL that looks like this:
https://[your-stage-domain]{entry.fields.slug}?isPreview=true&x-vercel-protection-bypass=[your-bypass-token]&x-vercel-set-bypass-cookie=samesitenone
Note that {entry.fields.slug} is literal text. My URL, for instance would be:
https://preview.contentful-example.nicholasrussellconsulting.com{entry.fields.slug}?isPreview=true&x-vercel-protection-bypass=[my-bypass-token]&x-vercel-set-bypass-cookie=samesitenone
To test its up and working, go to our “Home” Page entry in our stage-aliased or development-aliased environment and click
Open Live Preview.

Note that we did not setup a preview platform for our production-aliased environment, you should not be previewing content on production,
but if needed you can setup a platform for your production domain as well with the same steps.
Step 6: Disallow crawlers
If you leave this site up on your production domain it will inevitably attract crawlers. You probably don’t want my example content indexed
on Google—nor content created during your development cycle. For that reason, you should explicitly disallow all crawlers in your
robots.ts (src/app/robots.ts) until your ready to launch.
export default async function robots(): Promise<MetadataRoute.Robots> {
    const isProduction = process.env.VERCEL_ENV === VERCEL_ENV_PROD;

    if (!isProduction) {
        return {
            rules: {
                userAgent: "*",
                disallow: "/",
            },
            sitemap: undefined,
        };
    }

    const locale = await deriveLocaleFromHostHeader();
    const baseUrl = CANONICAL_DOMAIN_MAP[locale];

    return {
        rules: {
            userAgent: "*",
            allow: "/", //change this property to disallow
        },
        sitemap: `${baseUrl}/sitemap.xml`,
    };
}
Conclusion
And that’s it. You now have an enterprise-level Contentful app live in production.
Here’s a concise list of what we’ve setup.
- Deployed site on Vercel with custom domains
- Contentful space with production-ready content types, entries, and assets
- GitHub pipelines that trigger Vercel builds
- Preview platforms configured for each domain and locale you support
- Vercel analytics (optional)
- Edge Config (optional) for maintenance mode support
- Local development setup using Vercel CLI and environment variable pull scripts
- Contentful Utility Suite installed globally to handle future imports/migrations